
Table of Contents
-
Issue #2: XAMPP shows me an error message when quitting the program!
-
Issue #3: What is this blue message about administrator rights and how do I get rid of it?
-
Issue #4: Can I make Apache start automatically without needing to open XAMPP all the time?
-
Issue #5: I am having trouble updating XAMPP to a newer version!
Intro
Hello!
In this tutorial, I will be discussing about how to set up a local web server. A local server allows you to have a pretty accurate preview of your web projects and offers you the ability to support more scripting languages without the usage of any remote hosts or web servers.
This guide is intended for webmasters of mainly beginner levels. It does not require any advanced coding skills nor knowledge to proceed. As long as you know how a website is constructed briefly, you should be fine!
Why should I set up a local web server?
While building your site purely through your device's files is easy, it poses a lot of issues down the line. For instance, when it comes to file paths, your browser will be unable to locate the root folder of your site since there is none set to begin with! In addition, various server-side scripting languages, such as PHP, along with certain commands require some short of server to function properly.
Fortunately, there is a way to set up a local server and view your site as if it was hosted online to save up time and resources! This guide will show you exactly how to do that. I hope you find it useful!
Things To Keep In Mind
I use Windows as an operational system and some steps or settings may vary from yours if you utilise a different OS.
Some parts of the guide are repeated so that readers have easier access to snippets without getting lost.
This is based on personal experience and a lot of research online. There might exist outdated or mistaken details!
Step by Step Guide
Installing XAMPP
First of all, we will be needing XAMPP to make this work. XAMPP is a software package that distributes Apache, a well-known web server software, along with other useful web-related systems. For now, we are going to focus on the former.
So go ahead and download the program! It's free! You can access its downloads page here. Go under the OS you are using (mine is Windows). I would recommend downloading the latest version.
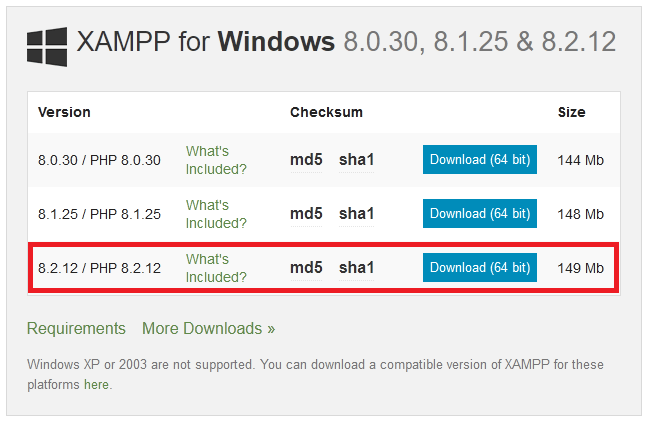
Now, just simply go through the program's installation. This may take a while to finish. It depends on your internet connection and device specs. Just be patient for a moment!
Regarding messages that might appear during this process:
-
If you get a message about UAC before the installation process, just press "OK".
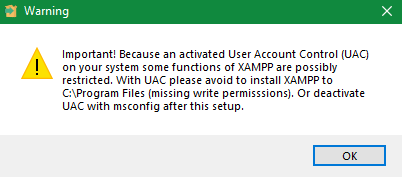
It just warns you not to install XAMPP inside the "Program Files" folder, so yeah... don't do that. (Why?) If Windows Defender Firewall asks you about Apache HTTP Server's access, just allow private networks. I don't think the public ones are a good idea for now (or ever, really).
You may tweak some settings in the Setup Wizard, but only if you know what you are doing. Otherwise, I suggest you leave everything as it is.
Once you are done and the software is installed, we can move onto the next step.
Getting A Grasp
To get a brief understanding of the software, let's mess around for a moment and enable our local web server without touching any settings.
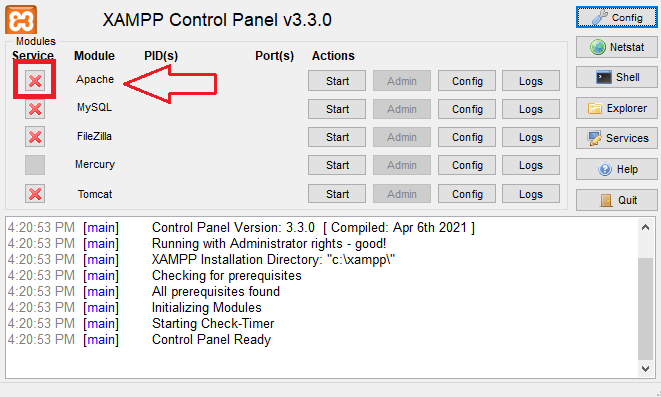
Open up XAMPP. It should look something like this:
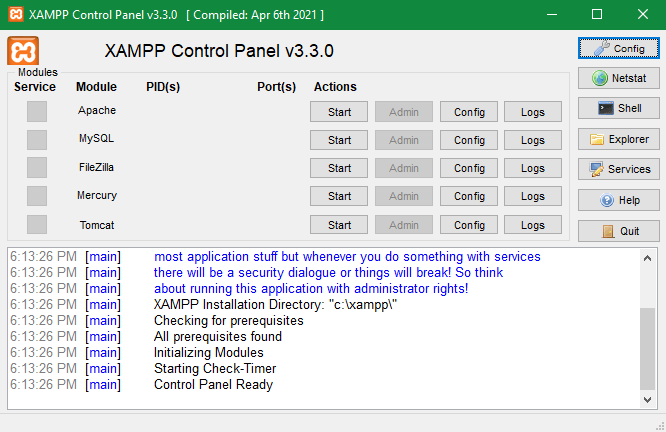
Let's enable Apache and see what happens! Press the "Start" button on Apache's row (first "Start" button right under Actions).
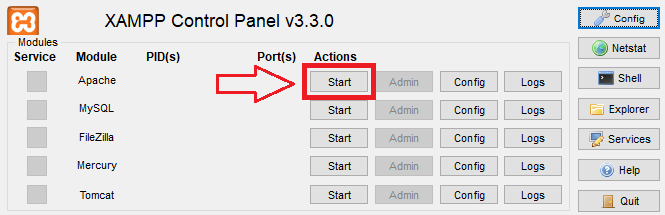
Apache should be marked with a (green) highlight and the output bellow should have showed this message: [Apache] Status change detected: running.
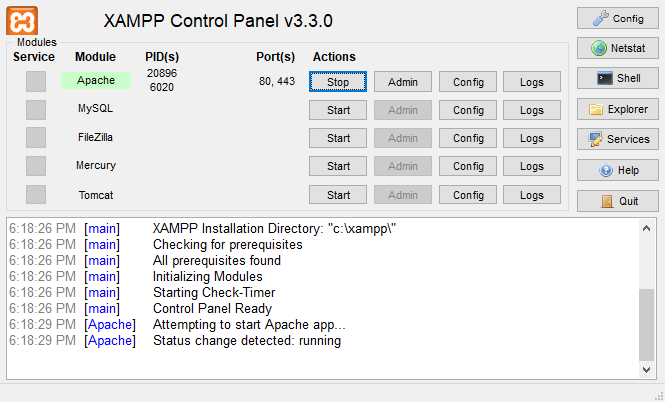
This means that Apache is working and your local server is activated!
Now, open a browser you like and type "localhost" in the URL/Search bar.
Your browser should direct you to a page called "Welcome to XAMPP". If not, just type "http://localhost/dashboard/index.html" instead.
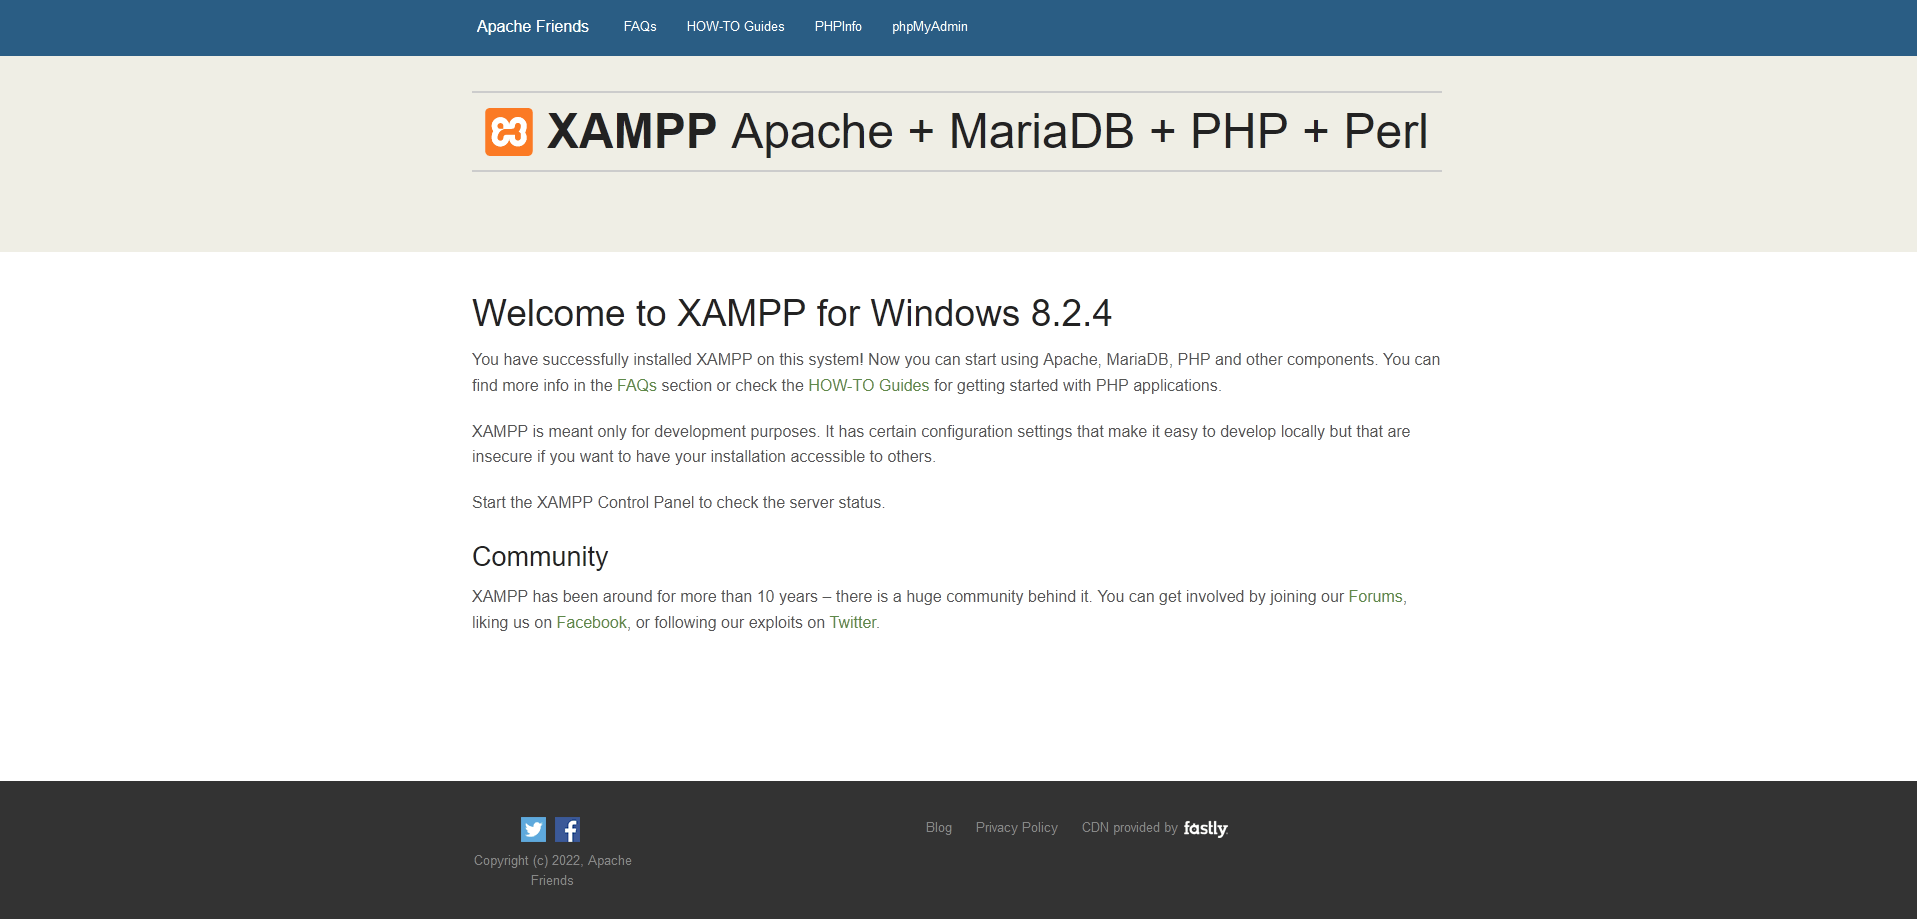
This is the default welcome page you'll get when trying out XAMPP for the first time. Feel free to have a look around and whatnot.
In the meantime, let's talk about how we can view our files on our local server by default (without any configuration).
According to XAMPP's FAQ document, we have to insert all of our files inside a folder called "htdocs".
To find this folder, press the "Explorer" button on the right column menu inside XAMPP's control panel.
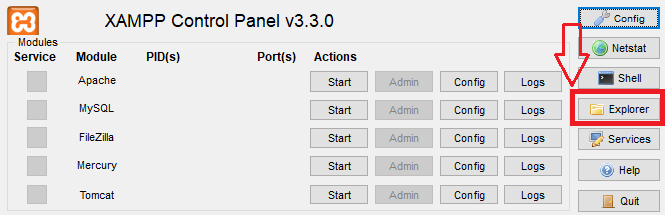
A folder called "xampp" should have opened up. The "htdocs" folder is inside this folder we just opened.
You can now place any files/folders you want inside the "htdocs" folder and later access them through your local server with this URL: "localhost/htdocs/". Just make sure to insert the correct path to your file.
For instance, if we insert an index.html page directly inside htdocs, we can access it through "localhost/htdocs/index.html".
You may skip the following chapter of the guide if you prefer to work with your site files inside the htdocs folder. However, I am sure most of you would like a bit more flexibility. Therefore, I am going to analyse how to change your local server's root path into whatever you want. If you don't like such modifications, you can reverse the changes whenever you wish.
Configuring Apache Settings & Setting Your Site's Root Folder
XAMPP already has a default root folder called "htdocs", but we don't want that!
So, we want to tell your local server where your site resides in your device's files so that it knows where to look. In other words, we must set a root folder. The root folder of a site is the parent folder containing all other files and folders existing in that site. It's also where the index.html page of the site is located.
To set your own custome root folder, we need to configure Apache's settings through XAMPP's files. Let's do it!
Open up XAMPP. On Apache's actions row, press the "Config" button. From the drop-down that appears, select "Apache (httpd.conf)".
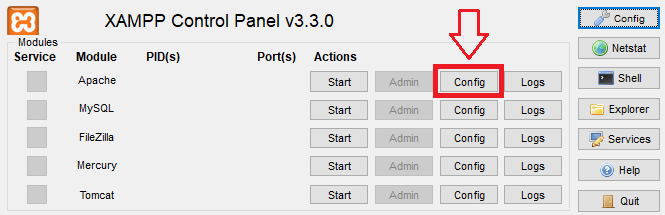
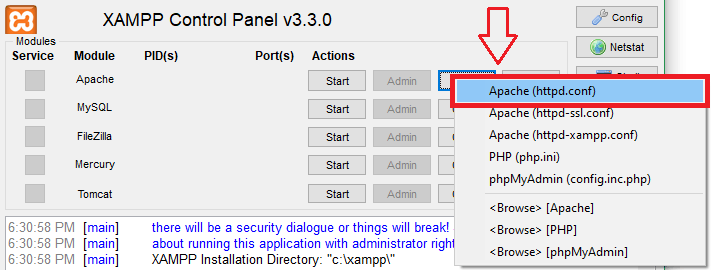
A (text) document named "httpd.conf" should have opened up.
Inside this document, search for the words "DocumentRoot" and "Directory". They should be right on top of each other, like this:
                        DocumentRoot "C:/xampp/htdocs"

                        <Directory "C:/xampp/htdocs">
When you find them, change their strings ("C:/xampp/htdocs" by default) to the file path of your site. Yes, both "DocumentRoot" and "Directory" should have the same path in their strings. Make sure that your file path is targeting the root folder of your site and not any page specifically - just like their default strings. Also, be sure that your path is inside the double quotation marks!
If you don't know how to find your site's path, a super simple way to do so is this:
Open your site's index.html document in a browser (as a file).
-
Copy whatever is between "file:///" and "/index.html" in the browser's URL bar.
... and you should have the path we want.
Once you are done, save these changes and close the document.
Starting Apache & Viewing Your Site Through Localhost
The difficult part is no more! Now every time you want to view your site on your local server, you will just need to activate Apache!
Open up XAMPP and enable Apache by pressing the "Start" button on its row (first "Start" button right under Actions).
Apache should be marked with a (green) highlight and the output bellow should have showed this message: [Apache] Status change detected: running.
This means that Apache is working and your local server is activated!
Finally, to access your site, open a browser you like and type "localhost" in the URL/Search bar.
Your browser should automatically detect the index.html page of your site and direct you to that. If not, just type "http://localhost/index.html" instead.
And that's it! You can now view your site through your local web server!
Here's my site's index page accessed through my local server for reference:

If you are done viewing your site, just stop running Apache through the panel and quit the program. Redo these final steps whenever you want to view your site again.
Now What?
What we just did was the basic set-up. You can now do literally anything your heart desires with the options XAMPP offers. This was just an introductory procedure to get you going. This journey ends here, but I encourage you to sail further!
...
Unless, XAMPP is having errors! *gasp* The horror!
In this case, we are brought to...
Troubleshooting & Extras
"Have you tried turning it off and on again?"
- The IT Crowd

Issue #1: I got everything working, but when I make a modification and reload my page, the changes aren't being showed!
Just hard-refresh the page using Ctrl+F5 instead of the simple reload.
Issue #2: XAMPP shows me an error message when quitting the program!
Ah yes, our beloved Application Error - Exception EAccessViolation in module xampp-control.exe at 0025B292...
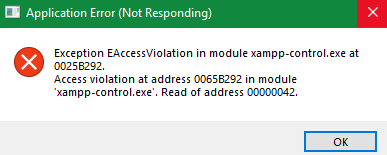
Something is going on with some security permissions and the software's privileges, but I cannot tell you for sure. What I can though, is that XAMPP doesn't seem to like them very much!
The solution might pose some security risks, but since I assume most of you will use this for personal purposes, I wouldn't worry about it. In the worse case scenario, you can manually reverse the changes.
Nonetheless, here's how to solve the issue:
Inside XAMPP, press the "Explorer" button on the right column menu. A folder called "xampp" should have opened up.
Quit XAMPP (press the Quit button, not the window's close button). You will get another error, but just ignore it for now. Just make sure XAMPP is not running.
Find the "xampp-control.ini" file inside the folder we just opened.
Right click on it and go to: Properties -> Security -> Edit -> Under "Group or user names" select "Everyone" (or your current user) -> Check "Full control", apply the changes & close the properties window.
And now, the next time you open and quit the program, no errors should be present. If that is still not the case, you could try restarting the program once or twice.
Issue #3: What is this blue message about administrator rights and how do I get rid of it?
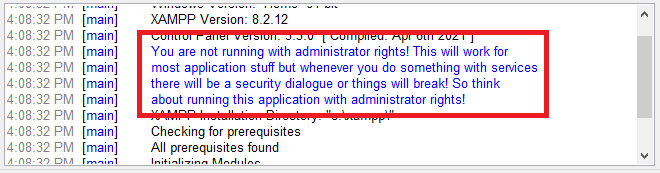
Well, it tells you exactly that: That you are running the software without administrator privileges. This usually isn't a big deal and you could ignore it. However, if you ever happen to utilise services, security dialogues will annoyingly appear and things might break.
To make this message disappear, you need to run XAMPP as administrator. If you don't know how to do this, search up "XAMPP Control panel" on your device's search bar & press the "Run as administrator" option. Click "Yes" to the warning it pops up.
If done correctly, the output bellow should have showed this message: [main] Running with Administrator rights - good!
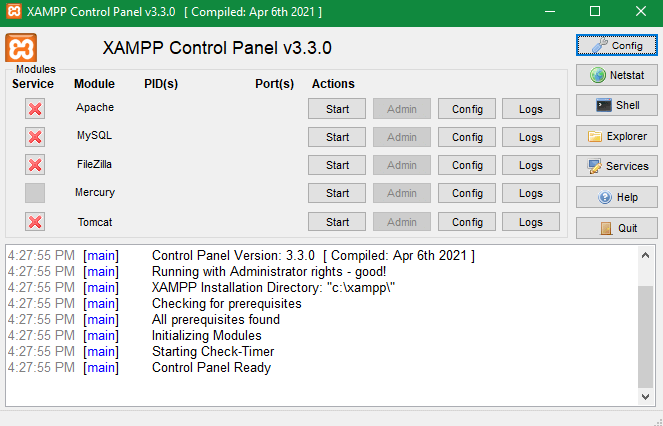
That means that you are running with administrator rights. Yay!
If you wish to automate XAMPP starting up with administrator rights by default, you could do this:
Search "XAMPP Control panel" on your device's search bar again, but this time, press the "Open File Location" option.
Right click on "XAMPP Control panel" and go to: Properties -> Click "Advanced" -> Make sure "Run as administrator" is ticked -> Press "Okay" and apply the changes.
Now XAMPP should be in administrator mode every time you run it.
Issue #4: Can I make Apache start automatically without needing to open XAMPP all the time?
Yes, you can! That means that you need to install Apache as a service. That is possible through XAMPP. Here's how to do that:
-
Run XAMPP in administrator mode. Check the previous section above if you don't know how to do that.
-
If done correctly, the output bellow should have showed this message:
[main] Running with Administrator rights - good!
-
Click on the (red) "X" button next to Apache.
A message will appear asking you to confirm, so press "Yes".
-
Apache will start downloading. It might take a bit. When the installation is complete, the output bellow should show these messages:
[Apache] Installing service...
[Apache] Successful!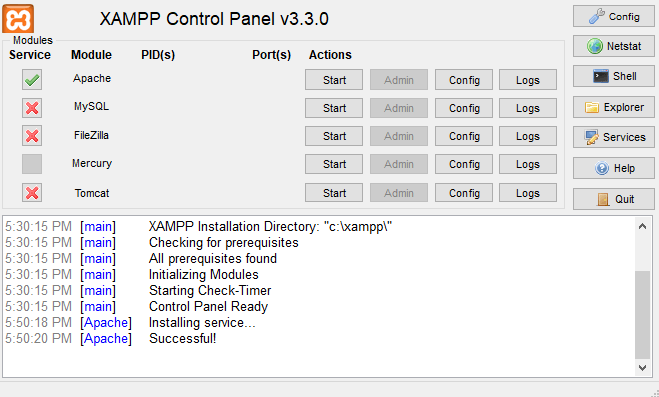
Now, every time you boot up your device, Apache should run automatically without needing XAMPP. That means that you can access your local server from the get-go. Very cool!
If you have just installed the service, you may need to shut down or restart your device while making sure that Apache is running in order to see the changes. (You can see how to start Apache here.)
If this doesn't seem to work:
Open up the Task Manager and go to: Services -> click on "Open Services" (at the bottom of the window).
A new window called "Services" should appear. Within the directory of this window, find Apache (Apache2.4) and make sure that its startup type is set to "Automatic".
If not, right click on it, go to Properties & select "Automatic" under the "Startup type" drop-down option.
If you want to uninstall the service, make sure it is not running and press the ticked box next to the its name (similarly to how we installed it, but in reverse). If done correctly, the output bellow should have showed these messages:
[Apache] Uninstalling service...
[Apache] Successful!
Bonus: If you just want to activate a module when opening XAMPP automatically without installing any services: open up XAMPP, press the "Config" button on the right column menu, under "Autostart modules" tick the module(s) you want to have automated and press "Save".
Issue #5: I am having trouble updating XAMPP to a newer version!
Before doing anything, you must make sure that you have backed up everything you have added or modified within XAMPP's folders. I mean it. Everything and anything you have created or altered. This is an extremely important step, as you will need to basically start from scratch. XAMPP does not have automatic updates nor does installing a new version replace old files the proper way.
So, here's how to update a bit more safely:
-
In order to proceed to the following steps, we need to find XAMPP's main folder. To do that, open up XAMPP and press the "Explorer" button on the right column menu.
A folder called "xampp" should have opened up. This folder is the entirety of XAMPP.
Locate and make a copy of every file you have modified or added within the xampp folder (or generally created using any module/service XAMPP includes). In our case, the only file we altered was the "httpd.conf" file. It is located in the /apache/conf folders. Once you find it, copy and paste it somewhere accessible, outside the xampp folder of course.
Once you are done backing up, go back to the main "xampp" folder and run "uninstall.exe" to uninstall the program.
-
When completed, you can go ahead and install the new version of XAMPP. See how to install XAMPP here.
Once you are done installing the new version, replace/add back all the files you backed up. In our case, find the new "httpd.conf" file and replace it with your backed up one.
Everything should be now working as per usual.
Issue #6: I need more answers!
You could read through XAMPP's official FAQ documents and check if your problem already has a solution written there.
Or take a look at XAMPP's FAQ document through the htdocs/dashboard folders. (file:///C:/xampp/htdocs/dashboard/faq.html)
If not, search around the web. There's always something answered somewhere 99% of the time.
That's All
Thank you for checking out my guide! I hope you learned something new. Happy developing!
